|
If you are using the 1.2 PCB or using the 1.3 PCB without the case the last thing that needs to be done is to connect the PCB to a DMX socket. I always use Neutrik XLR connectors for my lighting and audio cables. I have always found them to be very high quality, and I have never had a problem with one. There are of course cheaper alternatives those on a tight budget.
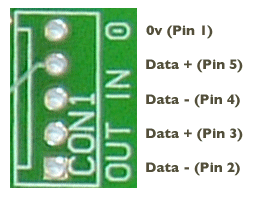
The correct pinout is shown in the diagram on the right. The same pinout is used on both PCBs. This uses the spare data pair on the 5 pin XLR socket for the input (pins 4 & 5). You could of course take this to a second XLR plug, in which case you would use pins 2 and 3 instead of 4 and 5 (and pin 1 to 0v)
For testing I made a simple DMX lead that connects the output to the input. A Test Application is available from the Software section. There is also a windows version available in the Links section.
|