Dimmer Curves
Every dimmer has a curve, that is how bright the light is in relation to the level of the associated DMX channel. Not all dimmers have the same curve. This means that if you were fading 2 lamps up at the same time on different dimmers there would be an imbalance between the 2 lamps brightness during the fade.
In order to compensate for this you can apply a dimmer curve to a channel, this changes the output level from that on the faders. By applying the correct curve on the output each dimmer can be made to behave in a very similar, possibly in an identical, way.
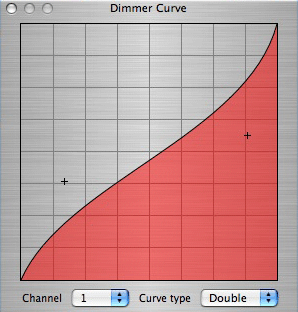
An example of a dimmer curve from the preset desk application :-
The X axis is the fader value, and the Y axis is the translated value sent to the dimmer. Both axis range from 0 to 255 (full range of dmx values)
Implementation
Each soft channel can have a dimmer curve associated with it. Thinking about it, you may want to apply multiple dimmer curves to a channel (for instance a pre heat curve, and then a compensation curve). Although you will be able to apply them to any channel, it only really makes sense to apply them to an intensity channel.
A dimmer curve can be defined in 3 different ways :-
- Linear
- Quadratic Curve (Single point)
- Cubic Curve (Double point)
Both the Quadratic curve and the Cubic curve are implemented using the NSBezierPath.
The curve can be represented in XML, allowing it to be saved and loaded.
I'm sure somebody could do the nice dtd for this (feel free to update this page with it), in the mean time I'll show a few examples :-
<curve type="linear" name="curve name">
    <points>
        <point name="start" x="0.00" y="0.00"/>
        <point name="end" x="255.00" y="255.00"/>
    </points>
</curve>
|
<curve type="single" name="curve name 2">
    <points>
        <point name="start" x="0.00" y="0.00"/>
        <point name="point1" x="255.00" y="0.00"/>
        <point name="end" x="255.00" y="255.00"/>
    </points>
</curve>
|
<curve type="double" name="curve name 2">
    <points>
        <point name="start" x="0.00" y="0.00"/>
        <point name="point1" x="255.00" y="0.00"/>
        <point name="point2" x="0.00" y="255.00"/>
        <point name="end" x="255.00" y="255.00"/>
    </points>
</curve>
|
The start and end points define the start and end of the curve, on a linear curve the line will be directly between these 2 points. You could us this to set a pre-heat value, or a maximum brightness, without affecting the rest of the curve. Both the start and end points must sit on one of the axis lines, i.e for the start point either x or y must be 0, and for the end point either x or y must be 255.
The other points (point1 and point2) are used to define the control points for the bezier curve.